

The same DEKFAST #14 can average 540 pounds of pull-out in 22-gauge steel and 900 pounds in 18-gauge steel. That spread, published in SFS pull-out testing, is the whole story. The #14 label doesn't set holding power. The deck under the point does, along with how deep the threads land.
Pick length and coating from the substrate, not from the product name. A screw that looks right in the box can be the wrong fastener the moment the deck gauge, the insulation stack, or the exposure changes.
Table of Contents
- DEKFAST #14 Screw Specifications at a Glance
- Pull-Out Strength by Substrate and Deck Gauge
- Choosing Coating, Length and Compatibility for Your Deck
- How to Install DEKFAST #14 Screws Step by Step
- Common Installation Problems and How to Fix Them
- Order the Right DEKFAST #14 Quantity for Your Job
DEKFAST #14 Screw Specifications at a Glance
Two DEKFAST #14 versions share a drive and a thread form, then split on coating, the thickest deck they are meant to drill, and the lengths you can order. Both are self-drilling low-slope fasteners for insulation and membrane over steel, wood, plywood, or structural concrete.
| Specification | Carbon steel (epoxy-coated) | 410 stainless (passivated) |
|---|---|---|
| Drive and head | #3 Phillips truss head | #3 Phillips truss head |
| Threads per inch | 13 | 13 |
| Thread major and minor diameter | 0.242 in and 0.151 in | Nominal #14; major and minor not published separately |
| Maximum deck gauge | 16 gauge (about 0.060 in / 1.52 mm) | 18 gauge (about 0.048 in / 1.22 mm) |
| Fully threaded lengths | 1-1/4, 2 and 3 in | 1-1/2, 2 and 3 in |
| Longer lengths | 4 to 12 in with 3-7/8 in threaded section | Comparable longer lengths |
| Ultimate tensile strength | 3,600 lbf | Not published for 410 stainless |
| Shear strength | 2,630 lbf | Not published for 410 stainless |
| Minimum torsional strength | 110 in-lb | Not published for 410 stainless |
Published strength covers the carbon-steel fastener only: 3,600 pounds ultimate tensile, 2,630 pounds shear, and 110 inch-pounds minimum torsion. I treat those three figures as a buying check on the fastener itself. They are test values, not allowable design loads, and 410 stainless does not publish the same set. Do not copy the carbon-steel numbers onto a stainless box.
On carbon steel the nominal #14 is a 0.242-inch major diameter and a 0.151-inch minor diameter, at 13 threads per inch. Both versions keep that 13-TPI form and a #3 Phillips truss head, so one bit covers the crew. That fine thread puts more flanks in a thin sheet than a coarse thread would.
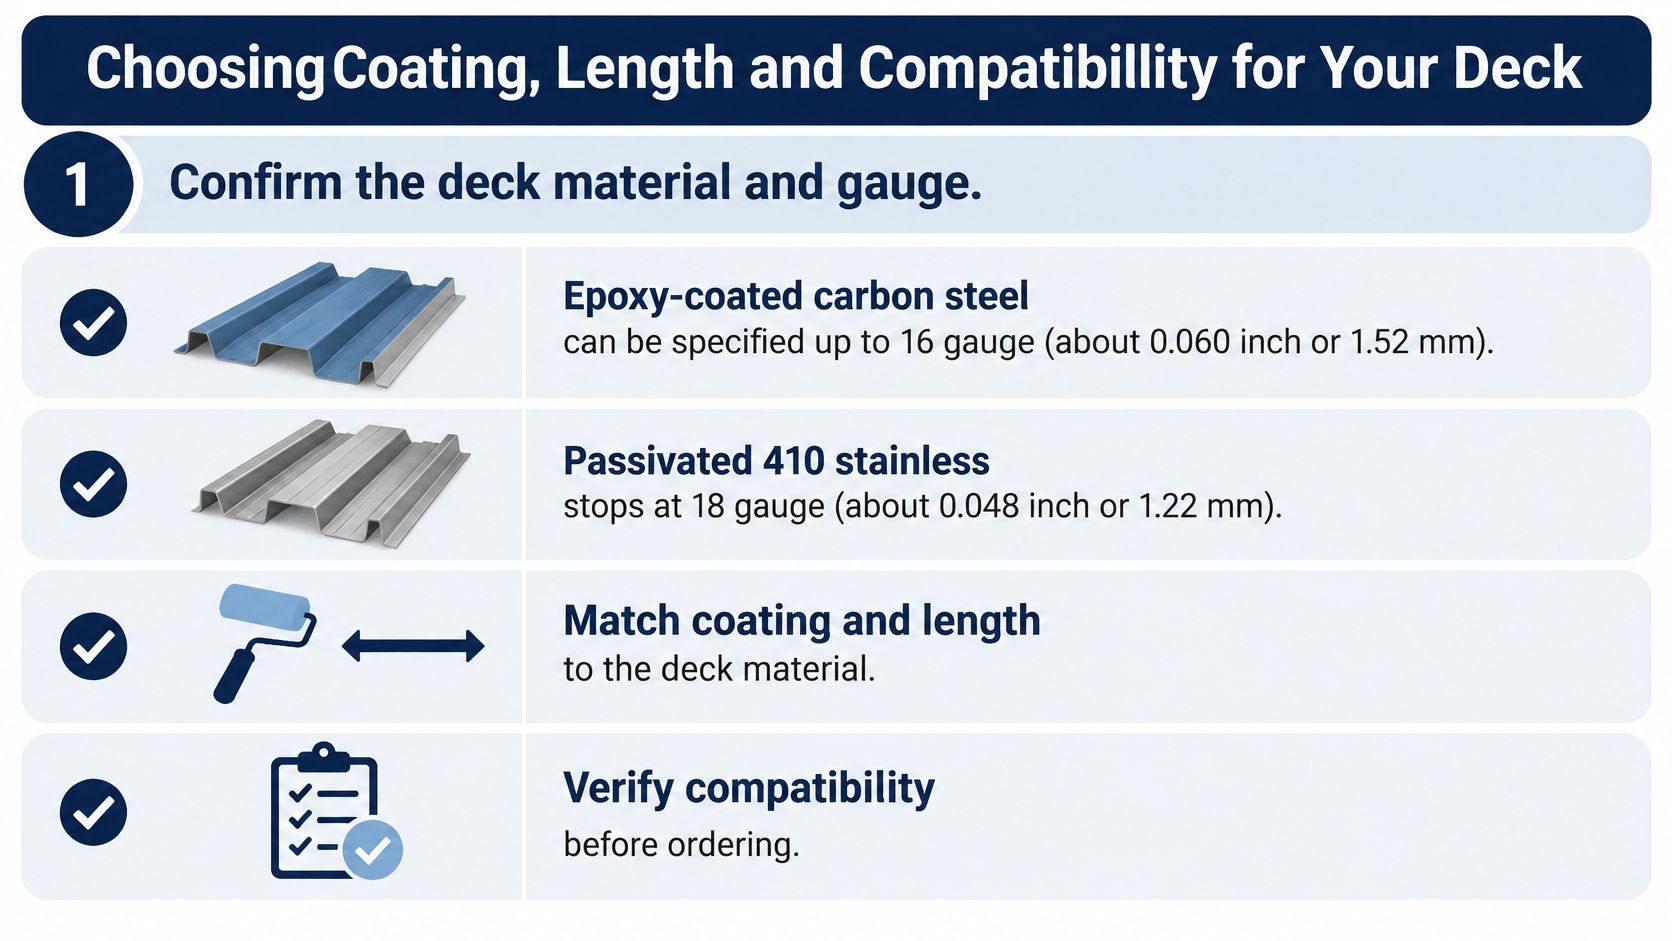
Read the gauge line as the thickest steel that version is specified to drill. Epoxy-coated carbon steel goes into wood, concrete, or steel up to 16 gauge (about 0.060 inch or 1.52 mm). Passivated 410 stainless is the lighter-gauge, different-corrosion option: wood or steel up to 18 gauge (about 0.048 inch or 1.22 mm). A deck thicker than that limit is outside the drill range of that version, whatever the head stamp says.
Length follows the stack, and only part of a long screw does the gripping. Carbon steel is fully threaded at 1-1/4, 2, and 3 inches. The 4- to 12-inch screws carry a 3-7/8-inch threaded section. Stainless is fully threaded at 1-1/2, 2, and 3 inches, with comparable longer lengths. Grip develops in that threaded zone. Extra shank clears insulation. It does not add thread engagement in the deck.
Confirm the version on the box by coating and by the gauge limit printed for it.
Pull-Out Strength by Substrate and Deck Gauge
Holding power follows the substrate, not the #14 stamp. Thicker steel gives the threads more metal to bear on and resists the sheet dimpling around the hole. Thin steel yields locally, and the screw pulls a cone of deck with it.
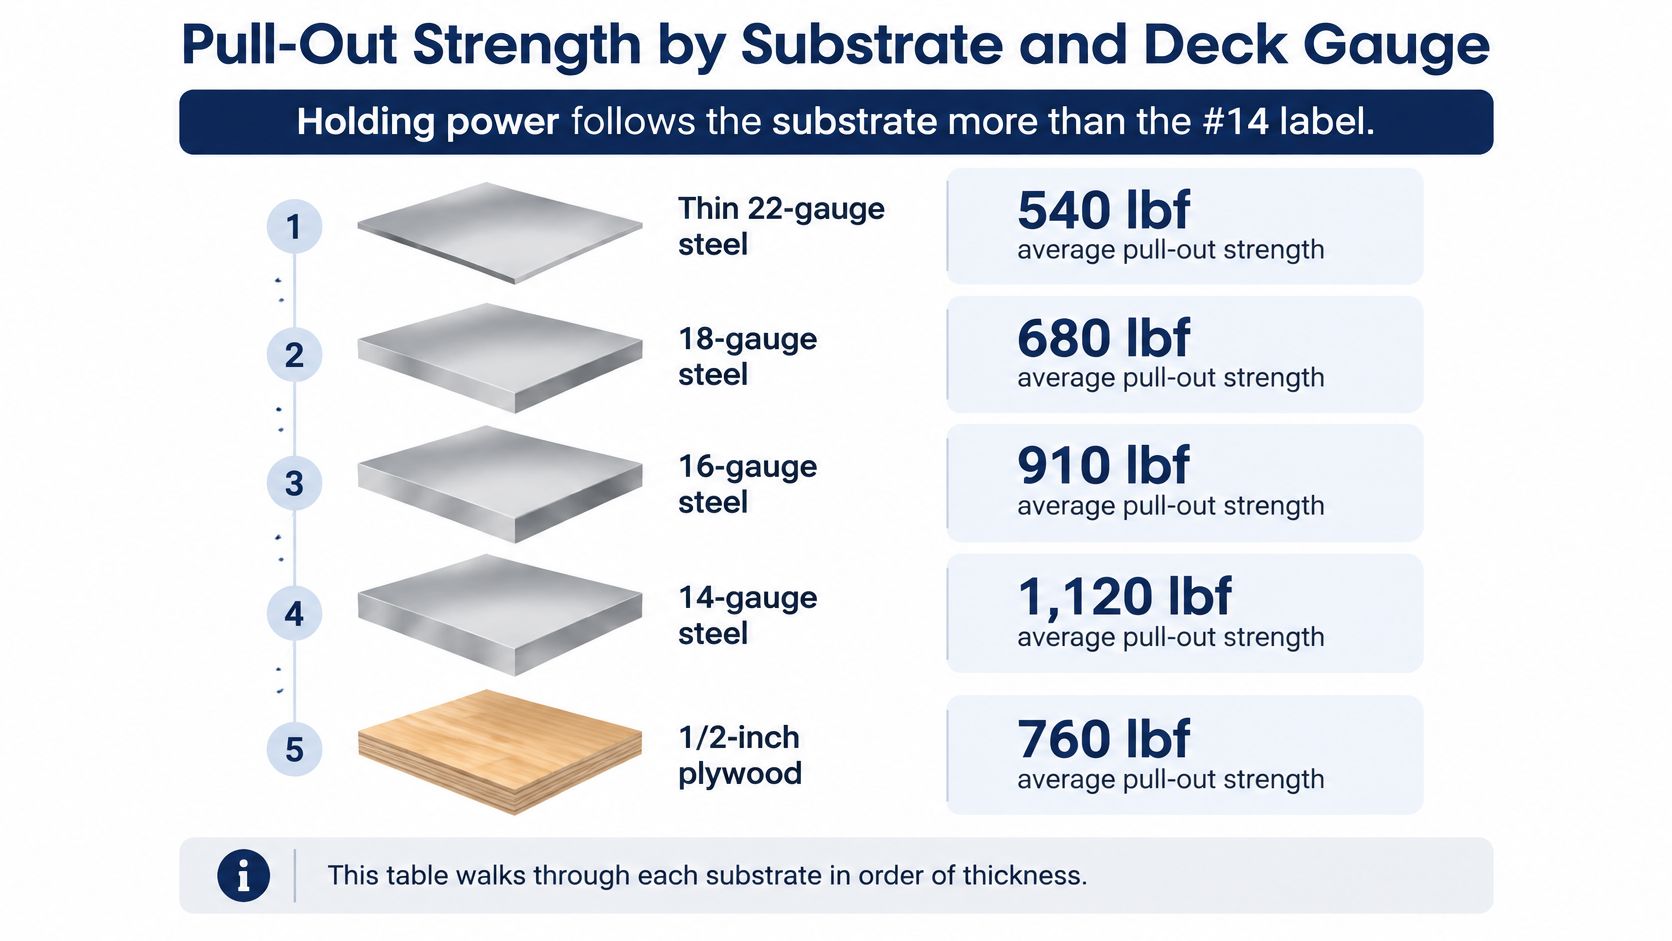
Triangle Fastener's published DEKFAST data reports average pull-out for a carbon-steel configuration of about 540 lbf in 22-gauge steel, 630 lbf in 20-gauge steel, and 900 lbf in 18-gauge steel. If you don't already read gauge as thickness, the sheet metal gauge guide is the short version. A higher gauge number is the thinner sheet.
| Substrate | Minimum penetration | Average pull-out (lbf) |
|---|---|---|
| 22-gauge steel | 3/4 in | 540 |
| 20-gauge steel | 3/4 in | 630 |
| 18-gauge steel | 3/4 in | 900 |
| 3/4 in plywood | 3/4 in | 590 |
| 2x dimensional lumber | 1 in | 605 |
| 4,000-psi concrete | 1 in | 850 |
Wood doesn't beat thin steel by much. 3/4-inch plywood averages 590 pounds. 2x dimensional lumber averages 605 pounds with 1 inch of embedment. 4,000-psi concrete averages 850 pounds at 1 inch of embedment, close to 18-gauge steel and far above 22-gauge.
Say the same screw pattern lands on 22-gauge deck in one bay and 18-gauge in the next. 540 lbf against 900 lbf means the thinner deck holds about 40 percent less in this test. Spacing that was comfortable on the heavier sheet can be thin on the lighter one.
Practical rule: These averages are test values, not allowable design loads. Apply the safety factor, the spacing, and the wind-uplift requirement before you treat a pound figure as capacity.
410 stainless is aimed at mild-to-light industrial corrosion and is limited to steel up to about 18 gauge. Carbon steel can be specified into thicker steel, including up to 16 gauge. In a coastal, chemical, or dissimilar-metal assembly, review compatibility before you swap one version for the other.
Compare your deck to the table. If the margin looks thin, confirm the layout with the roof designer or add fasteners where that designer allows it. Don't invent a denser pattern on the roof and hope the test average covers it.
Choosing Coating, Length and Compatibility for Your Deck
The deck under the screw decides holding power more than the #14 on the carton. The same fastener can be adequate on heavier steel and thin on a lighter sheet in the next bay, or too short once insulation is added. Pick coating and length from that substrate and that stack, not from the product name.
Match coating to the metals in the assembly
Exposure and the metals the screw touches come first. Epoxy-coated carbon steel is the usual specification for ordinary low-slope work away from heavy corrosives. 410 stainless is the usual specification for mild-to-light industrial exposure. Salt spray, process chemicals, and assemblies that stay wet still need a corrosion review before either version is written on the order.
I would confirm the coating and the alloy on the spec sheet for the Low Slope DEKFAST #14 self-drill screw before treating every carton in that line as the same finish. Match the corrosive exposure, then the length.
Galvanic pairing is the other check. Stainless threads in a carbon-steel deck or panel can corrode the sheet around the hole even when the screw itself still looks sound. Have the supplier review that combination before one alloy is swapped for the other.
On exposed-fastener panels, confirm the screw and washer with the panel manufacturer. Head style and base metal are covered in the guide to metal roofing screw types and materials. Over underlayment, the washer has to seat on that sheet without tearing it. A truss head that crushes the layer is not holding the membrane. It is cutting it.
Build the length from the stack
Length is three measurements added together: the minimum penetration that deck needs, the insulation or membrane above it, and a small allowance so the head and washer can seat without the threads stopping short of the deck.
Two inches of insulation over 20-gauge steel still owes that steel its minimum penetration, plus room for the head and washer. That stack points to a 3-inch fully threaded screw, then you check cover board and any tapered cricket. Shorter sizes in this line are fully threaded. Longer sizes carry only a limited threaded section, so measure whether those threads clear the insulation and enter the deck. Shank that never reaches the deck only crosses the build-up. It does not add grip. A screw that is short never develops the listed pull-out. One that is far too long can hit concealed services.
Write gauge, coating, exposure, layer thicknesses, length, and penetration on the order sheet. Every crew member and every supplier should be working from that line, not from "the usual #14."
How to Install DEKFAST #14 Screws Step by Step
The same #14 screw can hold very differently in different decks. Drive it square, seat the washer, and stop before the fastener crushes the insulation or strips its recess.
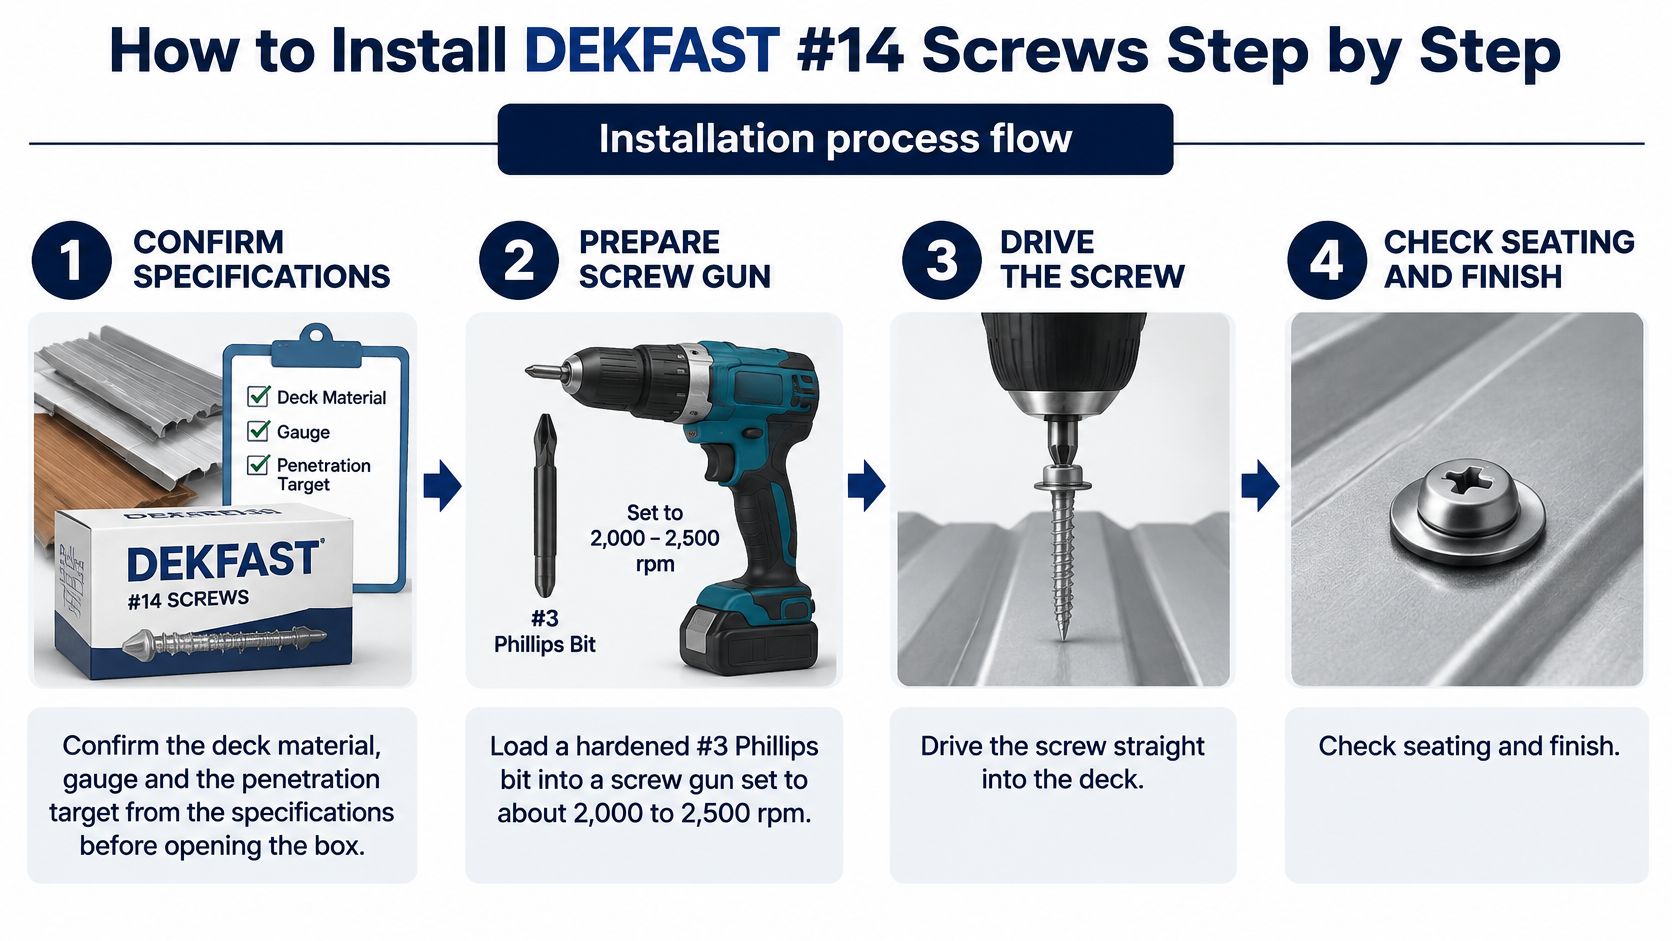
SFS installation guidance specifies a hardened #3 Phillips bit and a controlled screw gun at about 2,000 to 2,500 rpm. It gives minimum penetration targets of 3/4 inch for steel from 22 to 18 gauge, 1 inch for 2x wood, and 3/4 inch through plywood or OSB. These targets apply to the stated substrates; use the deck material and gauge to determine whether the screw is suited to the connection.
- Use the coating and length selected for the deck and exposure. Confirm the penetration target for the substrate before starting.
- Fit a hardened #3 Phillips bit and set the driver for controlled starts. Keep the screw square to the surface so the point does not walk and enlarge the hole.
- Drive until the washer seats firmly and the head sits flush. Stop there. A clutch setting that continues past seating can strip the recess, crush insulation, and reduce washer restraint.
- Check that the tip reaches the required penetration into or through the deck. Steel and wood do not require a pilot for this self-drilling screw. For structural concrete, predrill with a 3/16-inch carbide bit and limit the tool to about 1,500 rpm before driving.
- Replace the bit when its fit in the recess starts to deteriorate. A worn bit can cam out and damage the screw head.
Where the membrane meets a wall or penetration, the fastener line is only part of the closure. Choosing sealants for corrugated roof flashing helps with the separate question of choosing sealants for corrugated roof flashing.
For exposed panels, the through-fastened panel installation tips cover washer seating and panel fastening. A #14 Fastgrip™ Mechanical Galvanized type 17 is a different fastener for a different connection. Do not substitute it for a DEKFAST truss-head screw in a steel-deck pattern.
This short drive shows the seating rhythm: flush, then stop.
A correctly finished area has flush heads, undamaged washers, and uncrushed insulation. Set fastener spacing from the roof design, not the pace of the driver.
Common Installation Problems and How to Fix Them
When a fastener fails to seat or hold, check the bit, the driver setup, the washer, and the deck connection. Use the installation steps above for driver speed and required penetration; this table focuses on diagnosing the fault.
| Symptom | Likely cause | Fix |
|---|---|---|
| Stripped Phillips recess | Overdriving or a worn bit | Replace the bit and set the driver to stop when the head seats |
| Head sunk into insulation with crushed washer | Fastener driven past seating depth | Remove it and install a new fastener at the correct depth with a depth-controlled driver |
| Screw spins without pulling tight | Worn bit or poor engagement in the recess | Replace the bit and confirm it is fully engaged before driving |
| Screw does not reach the required penetration | Fastener too short for the insulation stack or deck | Select a longer fastener based on the full stack and deck thickness |
| Rust streaks appear | Coating does not suit the exposure | Review the exposure and select a compatible coating |
A stripped recess points to a worn bit or excessive drive force. Replace the bit and adjust the driver before continuing. If the head has crushed the washer, remove the fastener and use a new one; backing it out and reusing it leaves a damaged recess and may not restore a sound connection.
A screw that spins without tightening often has poor bit engagement. For a fastener that fails to reach the deck as required, check the full insulation stack and deck gauge before changing length. Add a replacement beside a failed fastener only if the roof designer confirms the location.
Check the washer as well as the thread. The guidance on when to use washers and when not to use them can help distinguish a washer problem from a failed fastener connection. Record recurring faults and inspect the bit and driver settings before continuing the next roof area.
Order the Right DEKFAST #14 Quantity for Your Job
Two roof areas with different deck gauges or fastening layouts need separate quantities. Keep the order tied to the takeoff, not to last year's purchase order.
- Use the coating decision and required screw length established for each roof area. Keep areas with different specifications as separate line items.
- Record the number of fasteners required by the project specification and layout. Have the roof designer confirm spacing and safety factors; a pull-out value alone does not set the pattern.
- Add a waste allowance for damaged bits, failed installations, and screws that must be removed. Base it on the job's expected rework, not an automatic percentage.
- Request the spec sheet and pull-out data for the specified substrate. Confirm that the data applies to the deck in the project.
- Before ordering, ask about bulk pricing, a sample of the exact length, and compatibility with the stated exposure.
Contractor's Den sells metal roofing fasteners, roofing underlayment, low-slope roof products, metal roofing pipe flashing, sealants, and snow retention products. A customer said the screws arrived fast and held up flawlessly.
Use the roof estimate calculator to base the waste allowance on the roof area and fastener count. For example, if the estimate calls for 1,000 screws and the project allowance is 5%, add 50 screws, for a total order of 1,050. The percentage is an example; use the allowance set for the project.