


A universal 3:12 minimum sounds simple, but it can mislead a bid. The safe minimum depends on seam type: lapped panels without lap sealant have a higher code floor than standing seam panels.
For each roof, separate the code minimum from the design target. The code floor sets the lowest permitted pitch for a qualifying panel assembly; NRCA design targets can call for a steeper slope. A roof pitch works like a drainage setting: as the slope gets shallower, the panel's seam and detailing take on more responsibility for managing water.
Table of Contents
- Minimum Pitch by Metal Panel and Seam
- How to Measure Roof Pitch on the Deck
- Why Pitch Changes How a Metal Roof Sheds Water
- When Code Minimum and Design Pitch Disagree
- Low Slope Detailing Sealant Underlayment and Fasteners
- Worked Examples from a Quarter Pitch to a 3 in 12
- Confirm Pitch Before You Order Accessories
Minimum Pitch by Metal Panel and Seam
Start with the row that matches your panel. Do not start with a favorite number from another job.
In the U.S. model residential code, lapped, nonsoldered metal panels without lap sealant require at least 3:12, equivalent to a 25% slope, while adding an approved lap sealant reduces the code minimum to 1/2:12, or 4%, and standing seam panels may be installed down to 1/4:12, or 2%, according to Chapter 9 of the 2024 International Residential Code. Those three rows are the lookup. Everything else is checking whether your exact assembly qualifies for the row you picked.
Think of the difference in plain terms. A 3:12 roof rises 3 inches in a foot of run, so water gets real help from gravity. A 1/4:12 roof rises only a quarter inch in that same foot, so the seam itself has to resist water that moves slowly and can be pushed sideways or uphill by wind.
The Three Code Rows in One Glance
| Panel and seam | Code minimum | Slope percent | Approximate angle | Rise per 12 in | Design note |
|---|---|---|---|---|---|
| Lapped nonsoldered, no lap sealant | 3:12 | ~25% | ~14° | 3 in | NRCA architectural target is also 3:12 |
| Lapped nonsoldered, with applied lap sealant | 1/2:12 | ~4% | ~2.4° | 1/2 in | Sealant must follow the panel maker's instructions |
| Standing seam metal panel system | 1/4:12 | ~2% | ~1.2° | 1/4 in | NRCA structural design target is 1/2:12 |
Read the last column before you quote. The code minimum tells you what is allowed for that seam category. The design note tells you what experienced designers often build to when they want drainage margin.
That gap matters most on standing seam work. A panel system may be code allowed at 1/4:12, yet the preferred design target for structural systems sits at 1/2:12. If you bid the flatter number without asking why, you have accepted tighter tolerances on deck flatness, end laps, and ponding for no reason.
Why Standing Seam Gets a Lower Number
Standing seam panels earn the lower floor because their concealed interlock and raised seam geometry keep the joint above the water plane and hide the clip. A lapped joint sits flatter, depends more on overlap, and on exposed fastener work it puts screws and washers in the weather.
If you are still weighing those two build styles, a clear comparison of hidden fastener and exposed fastener roofing systems helps you see why seam exposure changes the pitch conversation. It is not just appearance. It is where water can enter when drainage slows down.
On larger commercial scopes, that same seam first logic drives system selection, submittals, and warranty paperwork. Contractors comparing full service options for commercial metal roofing services from Rooftop Solutions will run into the same question at estimating time, which tested assembly is approved at the measured slope.
Sealant Does Not Reclassify a Panel
Here is where readers get confused. Adding a bead of caulk in the field does not move a panel from the 3:12 row to the 1/2:12 row.
For the sealed lap row to apply, lap sealants must be installed according to the approved manufacturer's instructions. The panel, substrate, flashing, end lap, and penetration details must all be compatible with that low slope use.
Practical rule: If the sealant type, bead location, and end lap detail are not in the panel maker's approved instructions for that slope, you do not have a sealed lap system. You have an unsealed panel with extra caulk on it.
Local rules add one more check. A jurisdiction can amend the model code, and the adopted edition in that city or county governs your permit.
So your first job is simple and strict. Match one row to the actual panel and seam, confirm that the maker rates that exact assembly for your slope, then confirm the slope on the roof itself. Specifying a 1/4:12 standing seam system using a panel rated only for 3:12 creates both a compliance problem and a leak risk.
How to Measure Roof Pitch on the Deck
Measure roof pitch as vertical rise over a fixed horizontal run of 12 inches. A level and tape measure give you both numbers directly.
The visual below shows the field steps, from choosing a straight plane to recording rise over 12.
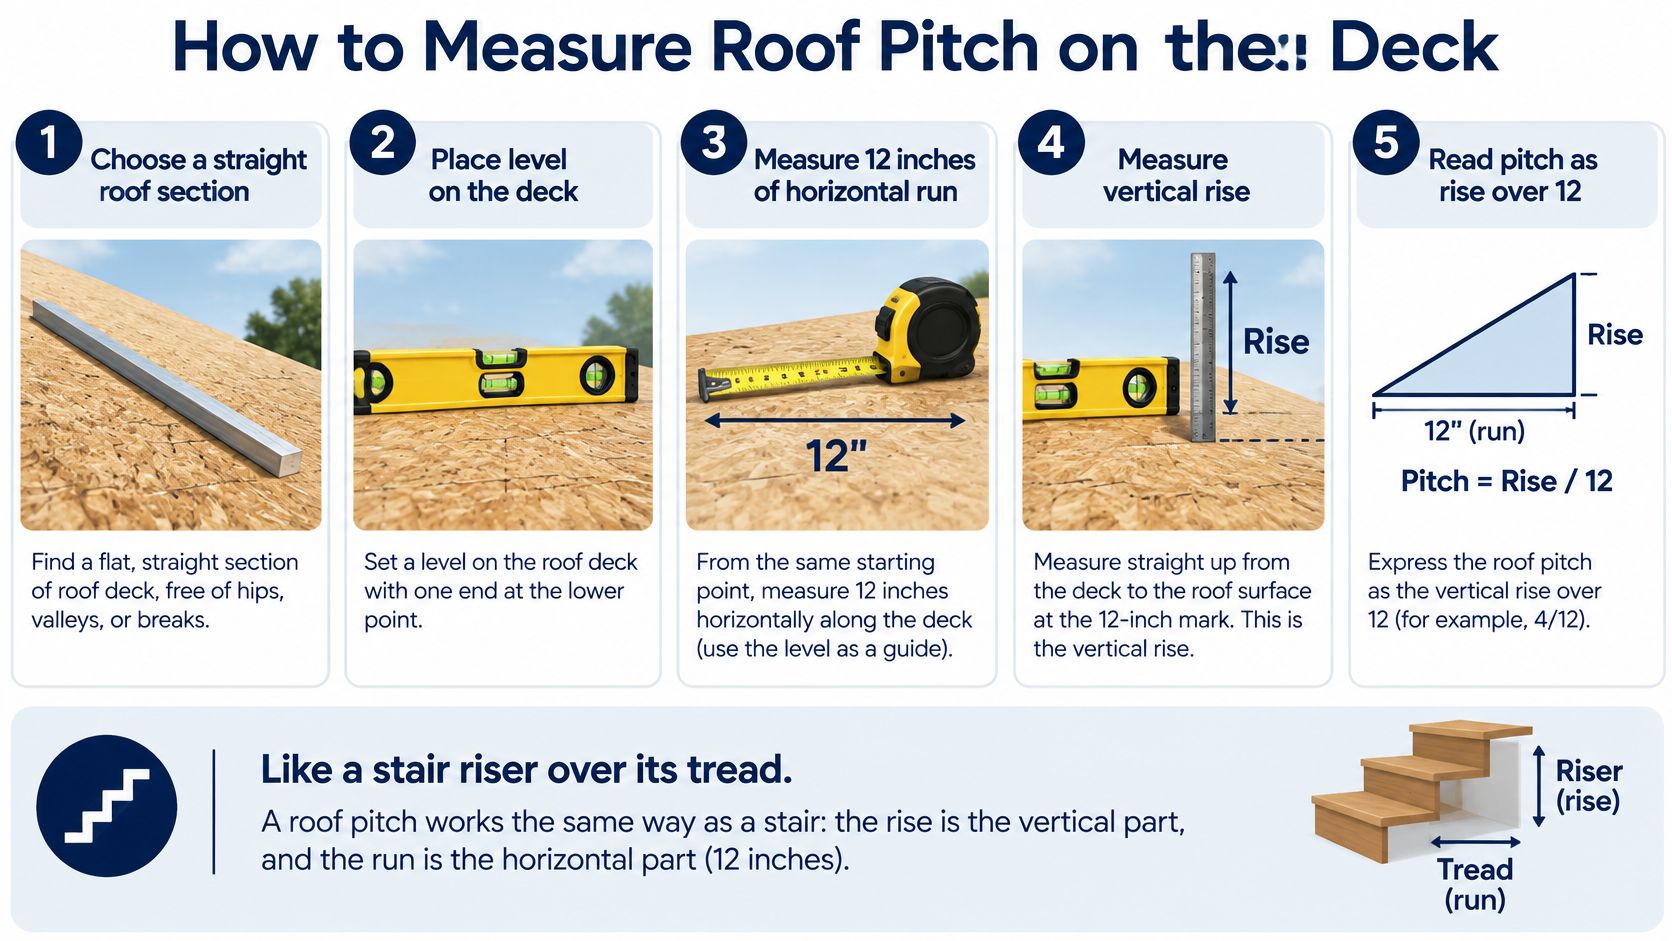
Field Steps in Order
- Choose a straight roof plane: Pick a clean section of deck, panel, or matching rafter. Do not measure in a valley, swale, or sag between supports.
- Set the level: Hold the level against the roof, with 12 inches extending horizontally from the surface.
- Mark the run: Center the bubble. The level now provides a fixed 12-inch horizontal reference.
- Measure the rise: At the outer end of the level, measure vertically down to the roof surface with a plumb tape.
- Write rise over 12: A 4-inch measurement means a 4:12 pitch. A half-inch measurement means 1/2:12.
- Repeat the check: Measure near both eaves and at mid-slope. Framing, added layers, and deck repairs can change the pitch across one plane.
A single reading may miss a change in slope. A roof can measure 3:12 at the eave and flatten where framing has settled, so check more than one location.
Converting to Percent and Degrees
Drawings and submittals may express pitch as a ratio, percentage, or angle. Convert the values so you can compare them without guessing.
For percent, divide the rise by 12 and multiply by 100. A 3:12 pitch is 25 percent. A 1/2:12 pitch is about 4 percent, and 1/4:12 is about 2 percent.
For degrees, use the arctangent of rise divided by 12 on a phone calculator. A 3:12 pitch is about 14 degrees, 1/2:12 is about 2.4 degrees, and 1/4:12 is about 1.2 degrees. Those degree values show how close the last two pitches are to level.
Valleys and Sag Need Their Own Measurement
Measure each valley separately. Its diagonal path can have a flatter effective slope than the roof planes draining into it.
Check for sag with a long straightedge laid between purlins or rafters on a low-slope roof. A dip in the deck can leave a shallow pond on a nominal 1/4:12 slope, even when the drawing shows a compliant pitch.
Record the installed slope, not just the architect's note. Put the measured ratio on the panel submittal before ordering sealant, closures, or fasteners. This helps match accessories to the roof as built rather than to the pitch shown on paper.
Why Pitch Changes How a Metal Roof Sheds Water
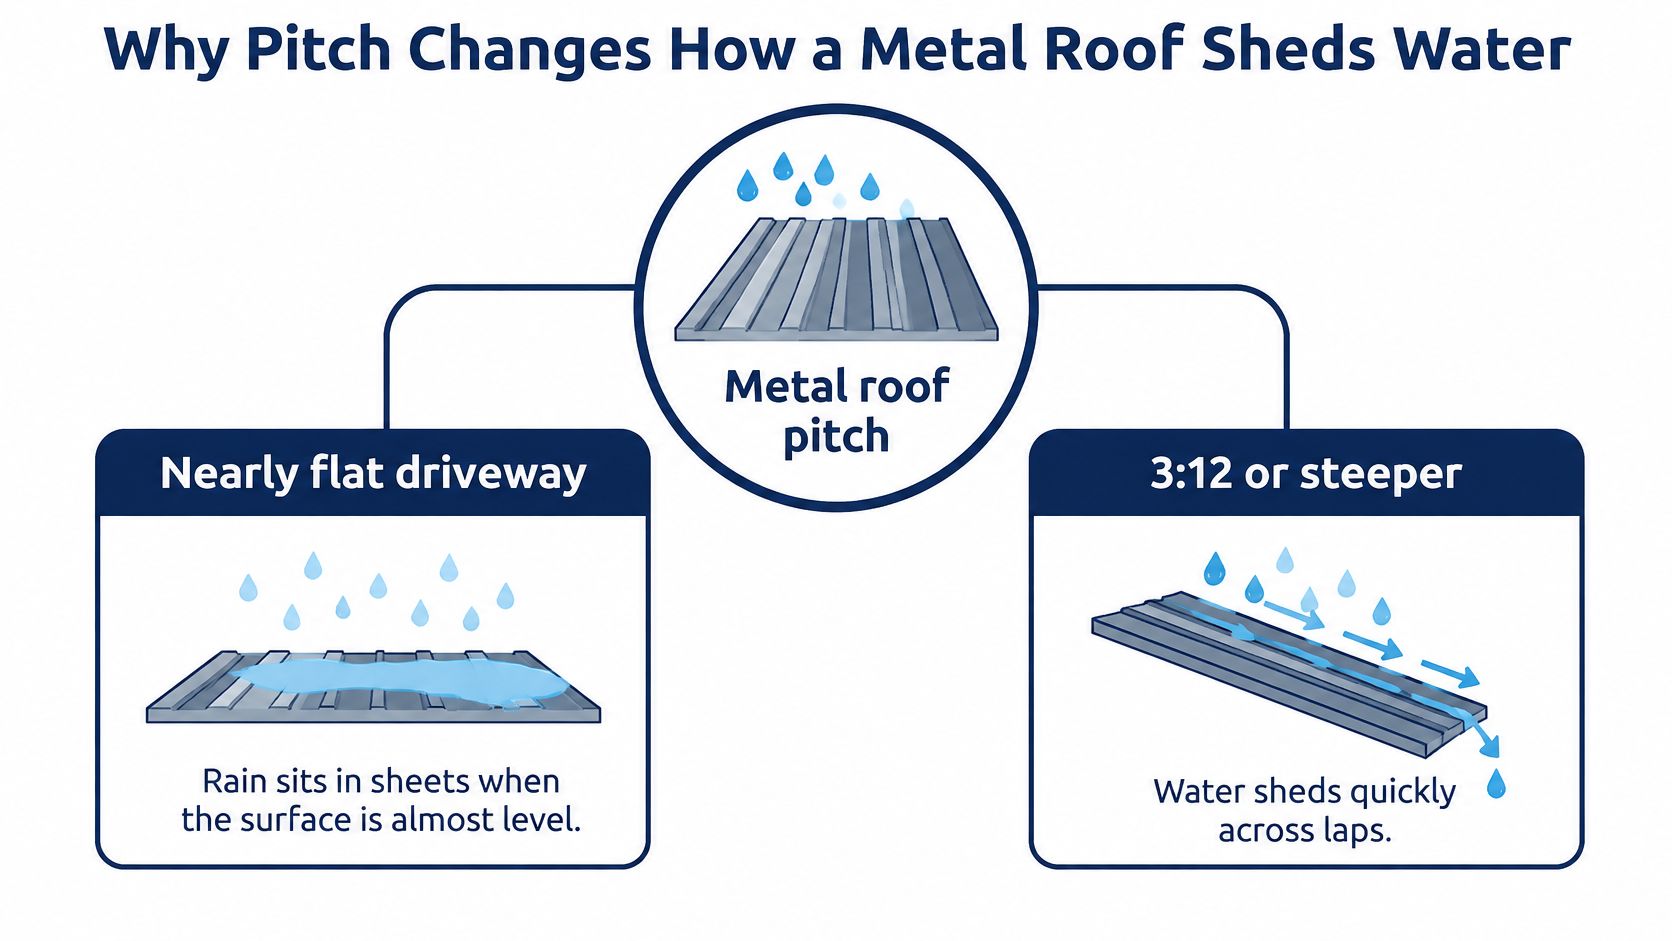
On a 3:12 roof, water moves downhill faster than it does on a 1/4:12 roof. That difference gives rain less time to sit at seams and laps on the steeper plane. On the shallow plane, water drains slowly and can linger around joints, especially where the deck has low spots.
As the pitch drops toward 1/2:12 and 1/4:12, water stays on seams longer, giving wind more time to push it into a joint. The diagram compares faster runoff on a steeper plane with slower sheet drainage on a nearly flat one.
Fasteners Live in Water Longer on Low Slopes
An exposed screw and washer create a sealed hole in the panel. On a steeper agricultural roof, water passes the washer quickly. On a low-slope roof, water can linger around it, testing the seal through heat cycles and exposing any overdriven or underdriven screw.
Standing seam construction reduces exposed penetrations. Clips sit beneath the seam, panels can move with temperature, and the interlock forms the weather seal. That design still depends on correct installation and suitable pitch, but it removes exposed fastener holes from the water path.
Underlayment Follows the Same Logic
Steeper architectural metal often uses conventional synthetic underlayment rated for that application. Low-slope metal needs a self-adhered or otherwise low-slope-rated layer specified for the panel assembly. A small leak at a lap has less slope to carry water away.
For the installation sequence at laps, eaves, and valleys, see this guide to roofing underlayment installation. Match the underlayment grade to how long water may remain on the roof, as well as to the panel system.
Snow Pulls the Decision Both Ways
Steep, slick metal can release snow in slabs. That reduces the time snow remains on the roof, but creates a hazard for people below the eave and can damage gutters.
Very low slopes tend to hold snow, ice, and debris longer. The roof carries that weight for more time, and meltwater can pond behind ice or leaves. Check both snow load and ponding risk against the roof's capacity.
On steep metal above walkways, entries, or gutters, specify snow guards or rails rated for the panel profile and anchored as the maker directs. Check the site snow load. On low slopes, include ponding and deflection in the same load check.
Wind uplift requires a separate engineering check, including clip spacing, fastener patterns, and the tested assembly. Flatter, wider pans and longer spans leave less tolerance for a missed clip or an overdriven screw.
Pitch shapes three linked decisions: seam style, underlayment grade, and snow management. Change the slope, and the way water drains, snow behaves, and the assembly must be detailed can change with it.
When Code Minimum and Design Pitch Disagree
A code minimum is a legal floor, not a universal design target. The floor depends on the seam type, and NRCA design targets can be steeper than the lowest code-allowed pitch.
For low-slope planning, commonly cited IBC thresholds are 1/4:12 for standing seam metal roof panel systems, 1/2:12 for lapped nonsoldered seams with applied lap sealant, and 3:12 for lapped nonsoldered seams without applied sealant. NRCA recommends a more conservative 1/2:12 minimum design slope for structural metal panel roof systems and 3:12 for architectural metal panel roof systems, according to NRCA roof system guidance on metal panel slopes. So a standing-seam system may meet the code floor at 1/4:12 while falling short of NRCA's design target.
The gap matters because a small deck dip, thick end lap, or misaligned penetration flashing can interrupt drainage on a low-slope roof. See how to measure roof pitch on the deck for the measurement method; the deck's actual profile matters as much as the pitch shown on a drawing.
The decision graphic below compares situations where the code floor and design target may differ.
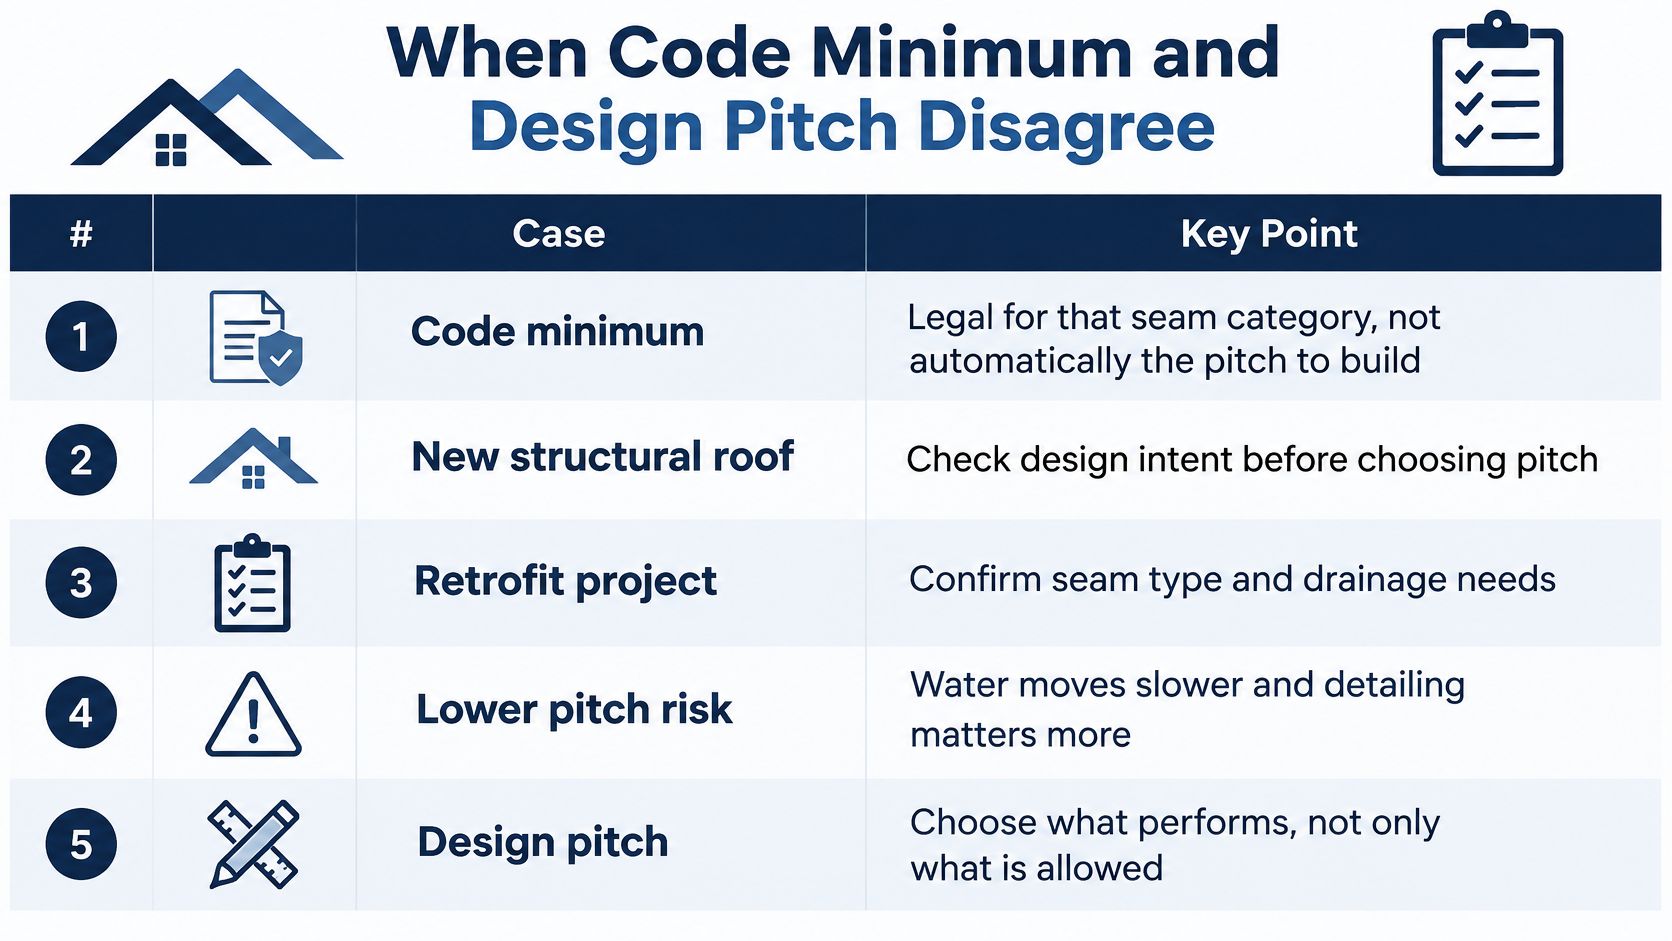
Which Number Governs Your Job
| Situation | Number to use | Why it changes |
|---|---|---|
| New structural standing seam | 1/4:12 code floor, 1/2:12 NRCA target | Use the code floor only with an approved assembly and positive drainage |
| Lapped seam with approved lap sealant | 1/2:12 | End laps, sealant, and penetrations must follow the approved low-slope details |
| Unsealed lap or exposed-fastener architectural panel | 3:12 | Field sealant does not change the panel system's stated minimum |
| Valley in a structural metal roof | 1/2 inch per foot | The valley slope is shallower than the adjacent panels |
| Existing low-slope reroof or re-cover | 1/4:12 may be waived | Applies only where the adopted code accepts performance-based positive drainage |
For reroofing or re-cover work, the 2018 IBC and International Residential Code allow a waiver of the usual 1/4:12 minimum for existing low-slope roofs when the project provides performance-based positive drainage. The drainage plan still needs to show how water reaches a drain or eave.
Valleys need their own check. They run flatter than the adjoining roof planes, collect debris, and carry concentrated flow. For structural work, use at least 1/2 inch per foot as the valley design slope.
Steeper roofs bring different access, safety, and snow-release considerations. Four Seasons Roofing's steep roof guide provides context for those tradeoffs. For permits and approvals, use this guide to metal roof installation codes and approvals to organize the project requirements.
Collect Four Documents Before You Lock a Number
- Adopted code edition: Confirm whether the IBC, IRC, or a local amendment governs, and record the edition year on the submittal.
- Panel approval at that slope: Get the listing or approval that names the exact panel, seam, and minimum slope.
- Manufacturer instructions: Pull the current installation-manual pages for low-slope end laps, sidelap sealant, clips, and penetrations.
- Field measurements: Record the roof-plane pitch and valley pitch separately as rise over 12.
If these requirements differ, do not average them. Use the strictest applicable requirement supported by a tested assembly, or choose a different panel system.
Low Slope Detailing Sealant Underlayment and Fasteners
At low slopes, water takes longer to leave the roof, so joints and transitions need details suited to that exposure. At 1/4:12 and 1/2:12, follow the panel system's specified lap, sealant, and fastening details.
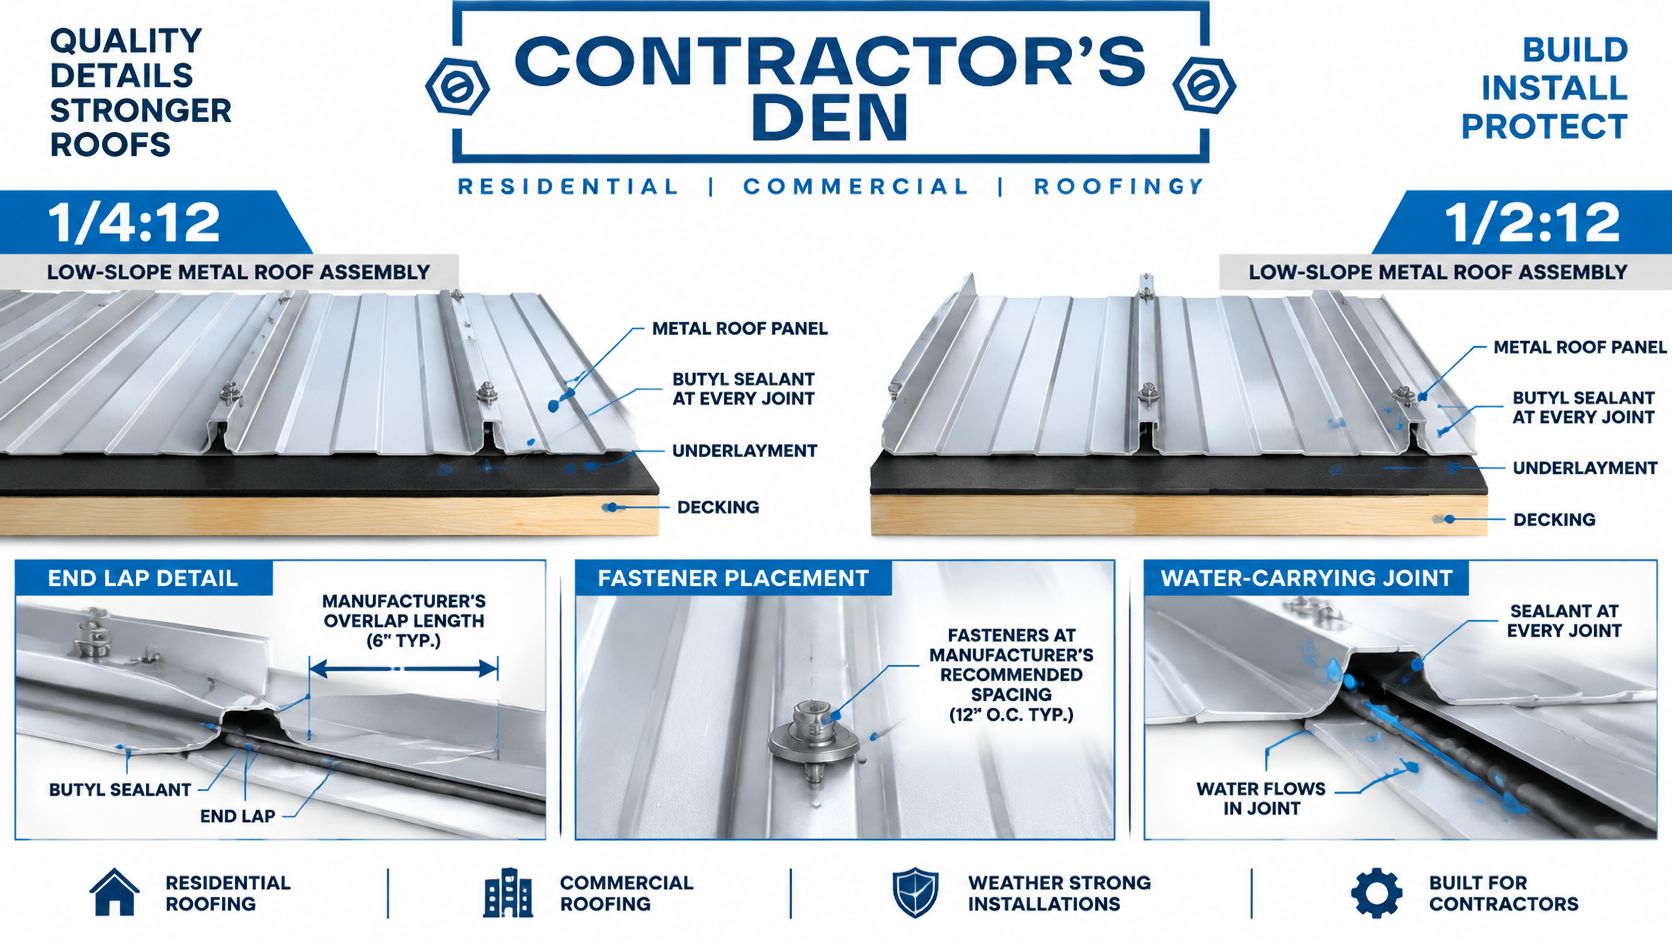
End Laps and Sidelaps
For end laps, use the manufacturer's specified overlap length, sealant location, and fastener row. A bead placed outside that detail may leave a path for water, especially where drainage is slow.
On a sealed sidelap system, use non-curing butyl tape sized for the seam. Place it in the specified path before fastening the next panel. The fasteners compress the tape, forming a continuous seal through the ribs and striations. For guidance on tape, tube sealants, and bead placement, see the basics of metal roofing sealants, then follow the panel manual for the exact detail.
Use tube sealant on trims, gutters, or flashings only when the assembly calls for it, and match the sealant to the metal and coating. The Titebond Weathermaster Metal Roof Sealant, 12 tubes per case is one cataloged option. The product name and case quantity are useful submittal details; the panel maker's lap instructions still govern the installation.
For a broader comparison of materials used on low-slope roofs, compare low-slope roofing materials for Oregon. For a metal roof, base the final assembly on the panel system's specified details.
Underlayment Flashings and Valleys
Choose the high-temperature, self-adhered, or low-slope underlayment named in the panel warranty. Where water may linger, the underlayment's suitability for that exposure matters; ordinary felt may not match the system requirements.
Use pipe boots rated for the metal profile and roof slope, and install them with sealant and fasteners as directed. At walls and eaves, arrange the flashing to keep water from backing into seams. Size valley metal and place cleats using the measured valley pitch, since it can differ from the pitch of the roof panels.
The video below shows lap sequence and sealant placement before panels are installed.
Fasteners Match the Roof Style
Exposed-fastener metal-to-wood panels, typically used at 3:12 or steeper, call for washered screws suited to the panel. A #10 LoGrip Hi-Lo style screw with an EPDM washer, type 17 point, and low-profile head is a common match. Tighten it enough to compress the washer, without dimpling the pan or cutting the washer.
Standing-seam clips need a flush fastener so the clip can sit flat and allow panel movement. A #10 pancake-head metal-to-wood screw is one option.
Count color-matched screws and washerless liner-panel fasteners from the panel layout and clip spacing. Before closing the roof, check that sealant follows the specified bead path, underlayment laps with the slope, and fasteners are neither proud, crushed, nor angled.
Worked Examples from a Quarter Pitch to a 3 in 12
Numbers get clearer when you attach them to jobs you bid. Walk through these three and note what changes, the panel, the target pitch, and the line you write on the quote.
Example One Warehouse Standing Seam Drawn at 1/4:12
Say a warehouse uses structural standing seam over open purlins, drawn at 1/4:12. The seam category allows that floor, so the first conversation is not legality. It is whether you should design and build at 1/2:12 instead for drainage margin.
NRCA recommends 1/2 inch per foot, or 1/2:12, as the minimum slope for structural metal panel roof systems even though some codes and manufacturers permit 1/4:12, and it recommends designing structural panel valleys for at least 1/2 inch per foot because valleys have a lower effective slope than adjacent panels, according to NRCA guidance on structural metal panel design slope. On this job, measure the finished deck, check purlin deflection with a straightedge so pans do not pond mid span, and measure the valley on its own. A compliant panel pitch can still leave a valley too flat to drain.
Specify concealed clip fasteners, low slope rated underlayment where the system requires it, and factory end lap details with sealant in the tested path. On the quote, write the panel name, its tested minimum slope, your field measured plane pitch, and your valley measurement. That line tells the owner exactly what assembly justifies the flat design.
Example Two Porch Re-Cover with Sealed Laps at 1/2:12
Now say a porch re-cover measures a true 1/2:12 and the owner wants lapped panels to control cost. That can meet the sealed lap minimum only if the lap sealant, end laps, closures, and pipe flashings are the approved low slope details for that panel.
Swap in an unsealed agricultural panel to save money and the job changes categories. You are no longer quoting a 1/2:12 sealed system. You are looking at a panel that belongs at 3:12, installed far below its row.
Quote line for this job: Panel name and profile, tested minimum 1/2:12 with manufacturer lap sealant, field measured 1/2:12, sealant and closure package included. If any item drops out, the pitch approval drops with it.
Use a roof estimate calculator at this stage to count tape, closures, and flashings against the panel layout. Low slope accessories are not extras here. They are part of why the pitch is allowed.
Example Three House or Barn at 4:12
A residential barn with exposed fastener architectural panels at 4:12 sits safely above the 3:12 floor shared by the unsealed lap code row and the architectural design target. Water leaves quickly, washered metal to wood screws are the normal fastener, and detailing focuses on correct lap sequence and washer compression.
The pitch problem flips on this roof. Drainage is easy, but snow can slide in slabs onto a walkway or gutter, so snow retention becomes a safety add on rather than a drainage fix. Climate, ice, snow, and debris still deserve a check at lower architectural pitches, but at 4:12 your main quote line is simpler. Name the panel, state its tested minimum, record the 4:12 field measurement, and note snow retention if the eave sits over a drop zone.
Across all three jobs, one habit holds. Drawings alone are not the installed slope, so measure it, write it down, and build the accessory package that the measured pitch requires.
Confirm Pitch Before You Order Accessories
Use this as a go or no go check before metal is ordered. If any item is unknown, stop and get the answer. Do not drop a standing seam to 1/4:12 or an exposed fastener panel below 3:12 to save framing or hit a price.
- Adopted code edition: Confirm whether the IBC, the IRC, or a local amendment governs this job.
- Tested minimum slope: Pull the panel approval for that exact seam type from the manufacturer listing.
- Measured roof plane: Record pitch at both eaves and mid slope as rise over 12.
- Measured valley pitch: Compare structural valleys against 1/2 inch per foot.
- Positive drainage: Verify no purlin sag holds water, using a straightedge check or a rain test.
If all five pass, write the confirmed pitch and the tested minimum on the order. Carry the panel name, tested minimum, field measurement, and valley measurement on the quote, so your supplier counts tape, fasteners, underlayment, and flashings against a real takeoff rather than an estimate. Then build the sealed lap, underlayment, and fastener assembly that pitch requires.
Once your five checks pass, bring that confirmed pitch, panel name, and takeoff to Contractor's Den for the matching screws, pancake head clip fasteners, butyl tape, sealants, underlayment, pipe flashings, and snow retention your assembly requires. Order against the tested minimum you documented, ask for bulk quote help on color matched fasteners and sealant quantities, and keep your crew stocked so a low slope detail never gets improvised on the roof.