

You're usually asking about roof flashing nails at the point where the job is close to weather-tight and one small decision can still cause a leak. The flashing is cut, bent, and fitted. The shingles or panels are in place. Then someone reaches into a pouch and grabs whatever fastener is closest.
That's where good jobs separate from callback jobs.
Flashing fasteners don't get much attention until they fail. A loose nail, the wrong metal, a head driven too hard, or an exposed penetration in the wrong place can turn a clean install into a stain on a ceiling months later. Roofing nails have been around for a long time, with a documented history going back about 5,000 years, and mass production accelerated in the late 1700s when a patented machine in the United States could make about 200,000 nails per day according to this history of roofing nails. That manufacturing base is what made modern roofing fastener systems practical in the first place.
The catch is that old habits don't always fit modern assemblies. For concealed flashing under shingles, nails still make sense in many situations. For exposed metal flashing, especially on metal roofs and low-slope details, screws often give you a more controlled and more reliable result. If you work with TRUFAST fasteners for roofing applications, that distinction matters because the assembly often matters more than the fastener label.
Table of Contents
- The Right Fastener for the Job
- Anatomy of a Roof Flashing Nail
- Matching Nail Material to Flashing Type
- Nails vs Screws for Securing Roof Flashing
- Installation Best Practices to Prevent Leaks
- A Contractor's Flashing Fastener Buying Checklist
- Frequently Asked Questions About Flashing Nails
The Right Fastener for the Job
A lot of roof leaks start with a detail that looked minor on install day.
A contractor sets step flashing at a sidewall, uses leftover nails from another phase of the job, and everything looks fine from six feet away. Later, movement in the assembly, poor bearing at the head, or a mismatch between the flashing metal and the fastener starts to show up. The flashing edge lifts. Water finds the lap. The repair is never as cheap as choosing the right fastener the first time.
That's why the phrase roof flashing nails can be a little misleading. Most of the time, you aren't looking for some exotic specialty nail. You're deciding whether a standard roofing nail is appropriate for a concealed flashing application, whether the metal pairing is safe, and whether the detail should be fastened with a screw instead.
Field reality: The wrong flashing fastener usually doesn't fail dramatically. It fails slowly, then shows up inside the building.
On asphalt shingle work, standard roofing nails are often enough for flashing when the detail is concealed and the fastener is properly selected and driven. On exposed metal details, the better question is often whether you should stop thinking like a shingle installer and start thinking like a metal roofing installer.
That's where experienced crews save themselves trouble. They don't just ask, “Will this hold today?” They ask, “Will this still be sealed after movement, weather, and service work?”
A good flashing fastener choice does four things at once:
- Holds the metal flat: The head has to bear on the flashing without tearing it.
- Resists corrosion: The fastener metal has to live with the flashing metal.
- Penetrates correctly: Too short and it won't hold. Too long isn't automatically better if the assembly doesn't need it.
- Fits the exposure level: Concealed under shingles is one conversation. Exposed on metal roofing is another.
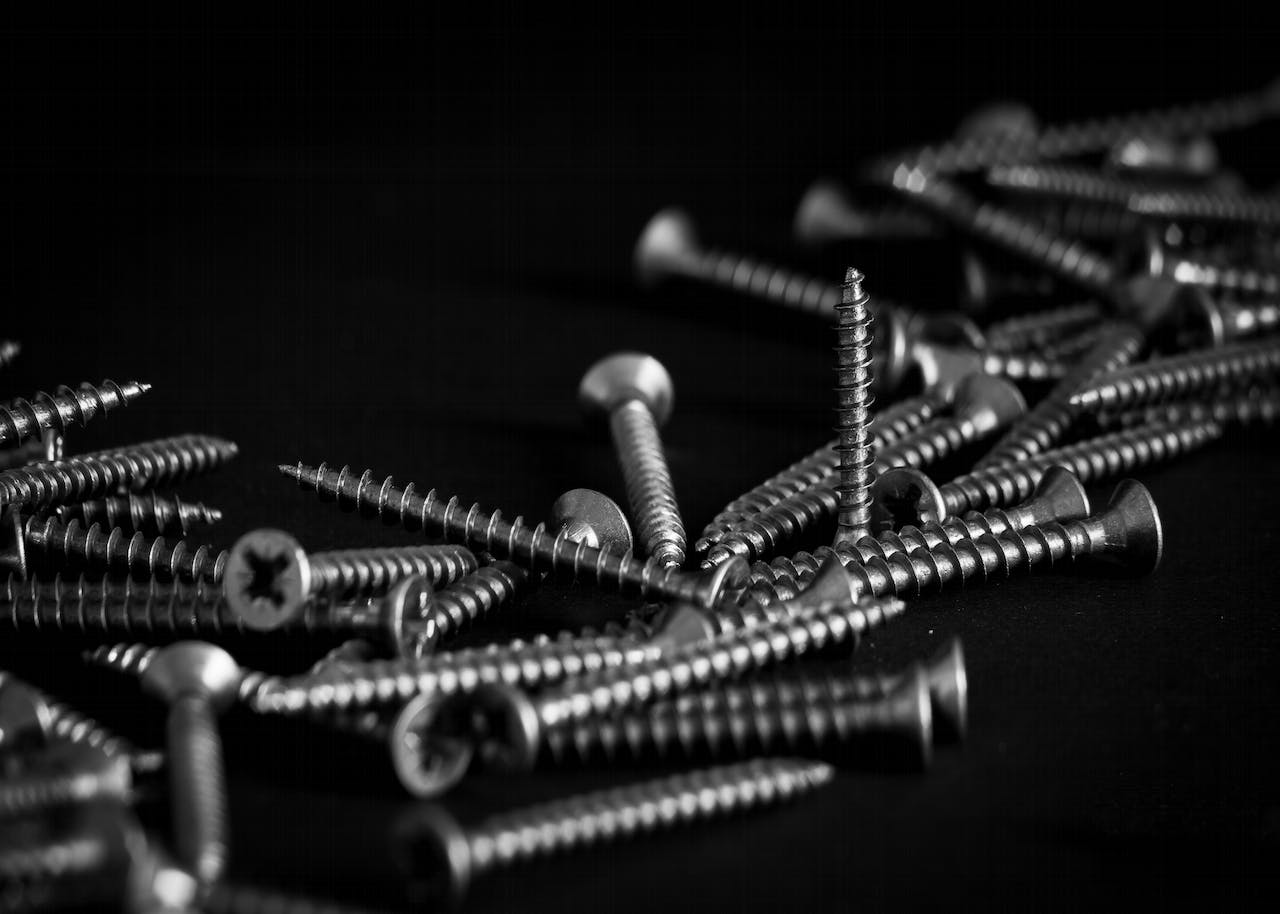
Anatomy of a Roof Flashing Nail
There usually isn't a separate bin in the warehouse labeled “flashing nails” that solves the whole problem. In practice, flashing fasteners come from the broader roofing fastener family, and the difference comes down to the details of the nail itself.
What actually makes a nail suitable for flashing
Standard roof nails are typically sufficient for flashing, with common lengths from 1 to 2 inches, diameters in the 10–12 gauge range, and heads around 3/8 inch to 7/16 inch. The important part is that the nail penetrates the roof decking by at least 3/4 inch, as outlined in IKO's roofing nail guidance.

A flashing fastener has four practical parts to think about:
- Head size: A wider head spreads clamping pressure and helps prevent pull-through.
- Shank: Smooth shanks install easily. Ring shanks can increase hold in some assemblies.
- Length: It has to suit the stack-up of the flashing, underlayment, and deck.
- Material: Corrosion resistance and metal compatibility often decide whether the detail lasts.
If you want a good parallel, think about tires on a truck. The wheel still bolts on either way, but the wrong tire changes traction, wear, and performance. Nails work the same way. “A nail is a nail” is the mindset that creates redo work.
Why each part matters in the field
Head size matters more than many installers give it credit for. Flashing metal can deform around a narrow head, especially where edges see movement or uplift. A broader head gives you better bearing and a flatter hold.
Shank size and gauge affect both strength and fit. For adjacent asphalt roofing applications, industry guidance calls for a minimum 12-gauge shank and a minimum 3/8-inch head, which is a useful baseline when you're evaluating roofing fasteners around flashing details. Washer choices also influence bearing and sealing in some assemblies, which is why this guide on when to use washers and when not to use washers is worth keeping in mind.
For low-slope or exposed fastening situations, a screw often gives you better control than a nail. One example is the Low Slope - 316 Stainless - #14 TRUFAST - Truss Head roofing Screw. It's a low-slope truss head roofing screw made from 316 stainless steel, with 16 variants across option1, option2, option3, and the catalog snapshot notes FM and Miami-Dade approved language for that product. That kind of fastener belongs in the conversation when the detail is exposed, corrosion risk is high, or you need a broader, more controlled bearing profile than a standard nail gives you.
A flashing fastener should match the assembly, not the installer's habit.
Matching Nail Material to Flashing Type
Material mismatch ruins good workmanship.
You can cut the flashing cleanly, lap it correctly, and place the fasteners where they belong, then still create a failure point by pairing the wrong metals. Regarding this, many articles wave a hand and say “match materials” without getting specific enough to help anyone on a roof.
Corrosion starts with the wrong pairing
The core issue is galvanic corrosion. When dissimilar metals touch in the presence of moisture, the assembly can act like a small battery. One metal sacrifices itself faster. That's why broad advice about “rust resistance” isn't enough. You need compatibility, not just a coated fastener.
According to Do it Best's roofing nails guide, safe combinations include stainless steel nails with aluminum flashing, while a bad combination such as galvanized nails with copper flashing can cause rapid material failure. That one mistake can damage the fastener, the flashing, or both.
Environmental exposure makes the decision sharper. Coastal salt, persistent humidity, and industrial contaminants all make bad pairings fail sooner. Even inland, roof details stay wet longer than installers think. Valleys, chimney saddles, sidewalls, and low-slope transitions hold moisture and debris. That's enough to punish the wrong metal combination.
Shop rule: If you have to ask whether two metals will get along, stop and verify before fastening anything.
The same logic applies when you're working around metal roofing systems. Panel thickness, flashing gauge, and substrate all influence how aggressive corrosion becomes over time. For crews that work across mixed assemblies, this overview of quality roofing metal thicknesses helps frame the bigger compatibility conversation.
Flashing and nail material compatibility chart
| Flashing Material | Recommended Nail Material | Acceptable (with caution) | Avoid |
|---|---|---|---|
| Copper | Copper | Stainless steel where the detail and manufacturer requirements allow | Galvanized steel |
| Aluminum | Stainless steel | Aluminum in suitable applications | Copper when direct contact creates compatibility concerns |
| Galvanized steel | Galvanized steel | Stainless steel if the full assembly supports it | Obvious mixed-metal pairings that create galvanic problems |
| Stainless steel | Stainless steel | Application-specific compatible metals | Coated fasteners that don't match exposure and assembly demands |
A few practical judgments matter more than brand labels:
- For copper flashing: Don't treat galvanized nails as “close enough.” They aren't.
- For aluminum flashing: Stainless is often the safer long-term choice.
- For mixed-metal repairs: Don't fasten first and sort it out later. The roof won't care that the truck had only one box left.
- For exposed locations: Use the most corrosion-resistant compatible option you can justify.
The cheapest fastener on the invoice can become the most expensive line item on the callback.
Nails vs Screws for Securing Roof Flashing
The nail-versus-screw question only feels like a debate if you ignore exposure.
For concealed flashing under shingles, nails remain standard and practical. For exposed metal roof flashing, trim, low-slope edges, and repair work where you need controlled compression and serviceability, screws usually make more sense. That isn't marketing language. It's installation logic.

Where nails still belong
Nails are fast. They're familiar. On shingle roofs, they fit concealed step flashing and similar details well when they're placed correctly and protected by the water-shedding sequence of the roof assembly.
That matters because flashing is often designed to be covered. The fastener's job is to secure the piece without becoming the primary water seal. If the flashing is buried under shingles and the laps are correct, a standard roofing nail often does exactly what it needs to do.
Nails also work well when speed matters and the detail is straightforward. Crews know the tool, know the pattern, and can move efficiently.
Why screws often win on metal work
The moment a fastener is exposed to weather on a metal roof, the requirements change.
A screw gives you controlled installation torque. A gasketed roofing screw adds a sealing element at the penetration. It's also easier to remove cleanly during service or retrofit work. On metal assemblies that expand and contract, that control matters. You're not just pinning flashing down. You're asking the detail to stay sealed while the roof moves through heat and cold.
Use nails where the assembly is designed around concealed fastening. Move to screws where the fastener becomes part of the weather-exposed detail.
Here's the practical comparison:
-
Nails
- Faster install: Good for concealed flashing in conventional roofing work.
- Lower hardware cost: Useful when the detail doesn't require sealing at the fastener itself.
- Less control at the point of fastening: Easy to underdrive, overdrive, or distort thinner metal.
-
Screws
- Better retention: Especially useful where uplift and movement matter.
- Better sealing potential: Gasketed screws are built for exposed penetrations.
- Better serviceability: Remove and replace without prying and deforming the surrounding metal.
A lot of installers were taught to think, “Flashing gets nailed.” That's incomplete. Some flashing gets nailed because it is concealed within a layered water-shedding system. Some flashing should be screwed because the fastener is part of the exposed weather line. This technical overview of metal roofing screw types and materials is useful if you want to sort those applications more precisely.
If the fastener head will live in the weather, start by asking whether a gasketed screw is the smarter detail.
Installation Best Practices to Prevent Leaks
A callback for a flashing leak usually starts the same way. The metal was fastened, the roof looked finished, and then the first hard rain found the one fastener that was overdriven, crooked, or placed where water sits.

Good flashing work depends on placement and control. A premium fastener still fails if the installer distorts the metal, misses the deck, or drives through a detail that should have stayed concealed.
Drive the fastener correctly
For asphalt roof assemblies around flashing, industry guidance calls for a minimum 12-gauge shank, a minimum 3/8-inch head, and enough length to penetrate at least 3/4 inch into the roof deck. ARMA's nail application guidance also identifies overdriven and underdriven nails as common failure points.
That applies directly to flashing.
- Flush is correct: The head should sit firmly without cutting into the metal or dimpling it.
- Underdriven is wrong: A raised head leaves space under the fastener and can interfere with the next course.
- Overdriven is wrong: Crushed flashing loses shape and gives water a place to work in.
- Angled is wrong: Uneven clamping distorts thin metal and weakens the hold.
Step flashing is one of the easiest places to make an expensive mistake. Fasten it to the roof deck only. Do not pin the flashing to both the roof and the wall, because the two planes move differently through seasonal expansion, contraction, and settlement.
Place fasteners where the detail can still shed water
Fastener spacing matters, but location matters more. The goal is to keep the flashing flat and secure without filling the assembly with extra penetrations.
In the field, that means a few simple rules:
- Keep exposed fasteners to a minimum: If the detail can be held with concealed fastening, do it that way.
- Stay out of water channels and lap areas: Do not place a fastener where runoff concentrates or where the next layer needs to sit tight.
- Do not rely on sealant to rescue bad placement: Sealant can support a proper detail. It does not fix a poor one for long.
- Coordinate with membranes and underlayment: Flashing fasteners have to work with the rest of the assembly, especially around ice and water barrier transitions at eaves, valleys, and penetrations.
This is also where the nails-versus-screws decision gets practical. Concealed flashing in a shingle system is often nailed because the water-shedding layers protect the fastener. Exposed metal flashing is different. If the fastener head sits in the weather, a gasketed screw usually gives a more reliable seal and more consistent clamping pressure than a nail. That is one reason many contractors have moved to gasketed fasteners on metal roof details, trims, and exposed flashing repairs.
A visual walkthrough helps if you're training a crew or checking field technique:
Exposed caulk over a bad flashing fastener detail is usually a temporary patch, not a finished solution.
A Contractor's Flashing Fastener Buying Checklist
A lot of flashing fastener problems start at the ordering desk, not on the roof. The crew gets to the job with a mixed box of nails, a few leftover screws, and no clear match to the flashing metal or exposure conditions. That is how small purchasing mistakes turn into callbacks.
Ordering gets simpler when you buy for the assembly, not by habit.

The questions worth asking before you order
Use this checklist before placing a bulk order:
-
What metal is the flashing made from
Match the fastener to the flashing first. Galvanic incompatibility can ruin a good detail long before the flashing itself wears out. -
Is the fastening point concealed or weather exposed
Step flashing tucked under shingles has different demands than exposed edge metal, counterflashing, or metal roof trim. -
Does the head give enough bearing on thin metal
Flashing can deform fast. A head that is too small can pucker the material or pull through under movement. -
Is the length right for the substrate
Fasteners need enough bite into the deck or framing to hold, but extra length does not improve the detail if it creates blow-through, splitting, or awkward seating. -
What jobsite conditions will this roof see
Salt air, heavy rain, freeze-thaw cycling, and persistent humidity all raise the bar for corrosion resistance and sealing performance. -
How many fasteners should you order
Quantity should be based on the detail layout, flashing runs, penetrations, and exposure, not a rough guess from the last job. Count the linear footage and roof details on the estimate, then add waste so the crew is not forced to substitute a different fastener halfway through the install. -
Would a screw be the better call
This matters most on exposed metal work. If the fastener head will sit in the weather, a gasketed screw usually gives better clamping force and a more reliable seal than a nail, especially on metal roof flashing, trims, and repair details.
That last question saves money more often than contractors expect. Nails still make sense in the right concealed applications, but exposed flashing on metal roofs is where many crews get better long-term performance from gasketed screws. Fewer loose fasteners, better sealing at the head, and more consistent installation torque are real advantages, not sales language.
A short buying checklist protects labor, schedule, and reputation. If the right fastener shows up with the right metal, head style, coating, and quantity, the crew can install the detail correctly the first time.
Frequently Asked Questions About Flashing Nails
Can you reuse old flashing nails
No. Reusing old flashing nails is asking an already stressed fastener to do the job again after removal, bending, and weather exposure. Even if one looks usable, the labor savings usually aren't worth the risk.
Do you need to pre-drill for flashing nails
Usually no for standard roofing applications. If the metal is unusually heavy, the detail is delicate, or you're working in a situation where distortion is a concern, crews may change fastening method rather than force a nail through and deform the flashing.
Are staples acceptable for flashing
Not as a primary flashing fastener. Staples don't give the same bearing or long-term confidence at the detail. Flashing needs secure hold-down and predictable performance, not a shortcut.
What about fastening flexible flashing materials
It depends on the product and the detail. Flexible materials change the conversation because the fastener can tear, pucker, or seal poorly if the head and substrate aren't matched. In many of those assemblies, a screw and washer system or a manufacturer-specific fastening method is the safer path.
Should exposed flashing nails be caulked
Sometimes, especially in repair situations or low-slope details, exposed heads may be sealed to reduce leak risk. But sealant should support a sound detail, not excuse a bad one. If the flashing layout is wrong, caulk won't turn it into a durable assembly.
Are roof flashing nails different from regular roofing nails
Usually not in the sense of being a completely separate product category. The difference is in choosing the proper roofing fastener for the flashing material, location, exposure level, and deck penetration requirement.
If you're sorting through roof flashing nails, exposed metal flashing screws, or low-slope fastening details, Contractor's Den is a practical place to compare the hardware that fits the assembly instead of guessing from a generic box label.